Showing posts with label polka dots. Show all posts

Monday, 10 September 2012

Tutorial: How to dot the nails

One of the easiest to create nail design is a polka dot nail - so how can we create it, hassle free?

Well, while I cannot gurantee that this is a sure-fire method that doesn't create even a little bit of mess it is one of the more reliable methods that other nail artists are also using

First, obtain a set of nail dotting tools. Instead of buying, I looked around the house to round up some items that I find helpful.

Just some examples of what I use, they all have different
dot circumference.
 

Next is to lay out your colors on a paper (that can hold the nail paint and won't seep it onto the surface area behind the paper.

Using these, you...

..dab onto these colors and then transfer them to nails
Have a really cute cat to calm your nerves!


You can create all sorts of designs with the dotting method: flowers, clouds - anything round!
Now, go have some fun!

Sunday, 9 September 2012

Lady Buggies

So for some reason, I'm in love witht he lady bug prints. So I made them into nails :3

It's actually very simple and there are two ways to doing the lady bug nails: one is to pain the nails black but leave the bottom part for the red, then fill in the connecting portion with black nail art pen so that the line is nicely defined.

Another way is to pain the entire nail red, and cover the top with black and then filling up any crooked lines with a nail art pen.

Will be doing a post to talk about dotting your nails, but it's really fairly simple once you know about it! Have fun lady buggies!

Lady bug nails for the thumb and ring finger :)

Remember to add a line in the middle to
create a realistic body for your buggy!

Love the colors, really brightens the dull
rainy season!
      

Sunday, 5 February 2012

Spring is here

Hi gals! Sorry for my short MIA, well the good news is I've moved into a comfortable, cozy new place and have my own nail corner now ^o^

This week, I'm presenting nails titled 'Spring is blooming'

IMG_9424
It is fairly easy to create this look, which looks like colourful flowers
blooming in the lustrous green

IMG_9421
And here are the colours I've selected for this design. I picked the most
striking green because I want the hues of the opposite colour spectrum t
really stand out. So from left, green, coral, blood orange, peach and purple.

IMG_9422
I'm missing a shot here with the black lines drawn on first, but
in words, you first add some curvy lines for the branch. Then
you use a dotting tool of your choice and dot the colours on

IMG_9423
The beauty is really how the dots work in random shades, so
don't worry. Let your mood lead you and dot the shades

IMG_9425
And you'd end up with ten lovely nails simple and modern, yet with such a cheerful
vibe that work will feel brilliantly cheerful too!

Hope you enjoyed the post! And I promise to catch up with more nail displays! Next up - Valentines Day!

Wednesday, 26 October 2011

Nude nails vs Polka Dot (diseased) nails

I know the header sounds kinda scary, stick with me for this please!

So I bought this really pretty nude color from DearFace sometime ago and decided to make something with it. So I painted me-self some nude nails

IMG_9021
Claws! Nails in nude

IMG_9018
N is for nude nails

IMG_9029
And then I decided to spice it up and in my mind, I had this very pretty polka dot vision so I
tried it. Erm, it doesn't quite turn out to be how I want it too though

IMG_9023
At first glance, they seem to be really diseased. I guess that makes the nails appropriate
for Halloween (and also, a lesson that says hey, your imagination is great but remember
the limits of your skills!) 

IMG_9022
I guess I can try to say things like it looks like spots on a leopard (is it weird that I'm also
reading a manga entitled Beast Master now?) but well...

IMG_9027
In the end I like it (LOL)

Thursday, 21 July 2011

Visions of Love, Envy VII & VIII

The final pieces of Envy.

I think for me, sometimes I see envy show in people differently. For those who know Envy like a map and know their way around it extremely well, I always feel them trying their greatest might to earn Envy from the people around them. Perhaps that is why Slytherins from Harry Potter are represented by green.

And now I present to you, the green Envy in all its mighty glory.

For the right, I used Jade Green once more and for
the left, I decided to use luminous blue


Envy Strikes - in darkness, Envy will find
its way of through loneliness
Peacock Eyes - Blue patterns of the peacock
feather are jewelled with envious gems
Blind Spots - When engulfed by envy, how
many of us can clear our vision and see
only the best in everything?
On the left: Blind SpotsMiddle: Peacock EyesOn the right: Envy Strikes


Do also check out:
Visions of Love, Passion

Saturday, 11 June 2011

Visions of Love, Passion

2nd Palette Experiment - Visions of Love, Passion

Colors used for this palette:

#01 #02 #03 
#04  #05 #06
#07


#01 - Dark purple (Sally Hanson)
#02 - Bright Red (Rubi)
#03 - Bloody Red (Sasa)
#04 - Metallic Pink
#05 - Black (Faceshop)
#06 - Gold (Sasa)
#07- White (Chatmingon)


Done hating, due loving
New brush tool for nail art (Daiso)
Experimenting with this, but it was not very helpful
My 4 most used surgical tools - needle, cotton sticks, dotter, brush
Work in progres


Love Blossoms #03, #04, #05 (Steps)


Infected Love - #4 & #05 (Steps)


My Heart All Cut Up - #02 & #07 (Steps)


Swirling Love - Every color (Steps)


Young Little Love - #02 & #04 (Steps)


Seduction - #03, #05, #06 & #07 (Steps)


Love is a disease - #02 & #07 (Steps)


True Bloody Love - #03, #05, #07 (Steps)


Love like a lifeline - #03 & #07 (Steps)


Love Prints - #02 & #07 (Steps)


Love is golden - #03 & #06 (Steps)
 

Unexpected Guest during experimentation


What I did:

Love Blossoms: Using a metallic pink base, I picked up some black on the needle to paint out branches. Adding a dot of bloody red with the dotter or brush, the flowers are added and immediately you have the design
(Back to Image)

Infected Love: Like Love Blossoms, using the metallic pink for base and black on needle for vein design
(Back to Image)

My Heart All Cut Up - Bright red for base, then using white you paint the top of a heart at the tips and the pointed shape of the heart on top of the nail. The inverted colors make it feel like the heart (in white) is cut out
(Back to Image)

Swirling Love -  A little more complicated, but start first with a dark purple base. I basically laid out all colors on paper (like the first image set with all the colors) and with a brush I just mix different colors to add swirls. Sometimes I mix #03 and #05, sometimes #02 & #06. At the end of it, you have multi layers of different color.
(Back to Image)

Young Little Love - Start with a metallic pink base, then add the french twist of bright red, with three pink dots for an over-the-top cuteness. Just like all young, puppy love. Sweetened and too cute
(Back to Image)

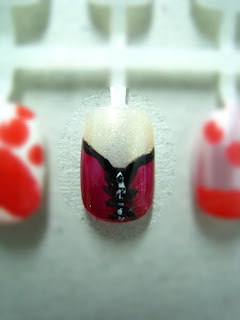
Seduction - Gold base, with bloody red forming a v shape at the mid-section of the nails. Paint the bottom of the V-shape bloody red and then add in the black outlines. A little white to the black laces will make it look more defined
(Back to Image)

Love is a disease - White base, with bright red inverted heart near the tip. Add in dots and you'd have the design look like the above pattern
(Back to Image)

True Bloody Love - Inspired by the vampire love stories. Using white as base, and bloody red for the blood trickle design. Mix bloody red with a pinch of black and make the gradient paint upwards from the tip of the nails
(Back to Image)

Love like a Lifeline - Simple bloody red base and a white on needle nailart
(Back to Image)

Love Prints - Bright red base with a white strip down the nail. Add little hearts to the white, first make two dots like Mickey Mouse ears and then using a brush, paint the rest of the heart shape
(Back to Image)

Love is golden - Two coats of bloody red and start brushing gold paint from the tip of the nails. Have in intensely concentrated at the tip and slowly fade it upwards. Like a gradient
(Back to Image)

Hope you like this experiment brought to you by Nailify.
Next week - Green Eyed Monster and Its Jealousy