Showing posts with label FaceShop. Show all posts

Friday, 23 September 2011

Mosaic Nails

As always, lay out the polishes on a sheet of painting paper
Using a brush, or a dotting tool, roughly color parts of the
nails with different colors
When you're done, clean up the edges that was done during
the painting
The lines where each color meets should be defined,
but don't worry if the lines are a little jagged
This will solve all problems for you! Using a black
nail art pen (or black polish on a dotter/brush), paint
along the edges
Add a line where the colors take up most of the nail
to create a more detailed mosaic feel
And you're done! Remember your top coat! :)
Close up of the thumb, in case you need to see
how it's painted
A BAD EXAMPLE
Started work on my right hand this time, before I started taking
photos and realize it's best to keep the lines sparse and simple
OVERKILL!!
Managed to remedied the situation by painting over the colors
and re-defining the black lines


Have fun with the colors!

Colors in use: Blue from Faceshop, Skin and orange from DearFace nail polish (korea)

Next up: Nail polish review for DearFace nail polish (it has arrived!)

Saturday, 11 June 2011

Visions of Love, Passion

2nd Palette Experiment - Visions of Love, Passion

Colors used for this palette:

#01 #02 #03 
#04  #05 #06
#07


#01 - Dark purple (Sally Hanson)
#02 - Bright Red (Rubi)
#03 - Bloody Red (Sasa)
#04 - Metallic Pink
#05 - Black (Faceshop)
#06 - Gold (Sasa)
#07- White (Chatmingon)


Done hating, due loving
New brush tool for nail art (Daiso)
Experimenting with this, but it was not very helpful
My 4 most used surgical tools - needle, cotton sticks, dotter, brush
Work in progres


Love Blossoms #03, #04, #05 (Steps)


Infected Love - #4 & #05 (Steps)


My Heart All Cut Up - #02 & #07 (Steps)


Swirling Love - Every color (Steps)


Young Little Love - #02 & #04 (Steps)


Seduction - #03, #05, #06 & #07 (Steps)


Love is a disease - #02 & #07 (Steps)


True Bloody Love - #03, #05, #07 (Steps)


Love like a lifeline - #03 & #07 (Steps)


Love Prints - #02 & #07 (Steps)


Love is golden - #03 & #06 (Steps)
 

Unexpected Guest during experimentation


What I did:

Love Blossoms: Using a metallic pink base, I picked up some black on the needle to paint out branches. Adding a dot of bloody red with the dotter or brush, the flowers are added and immediately you have the design
(Back to Image)

Infected Love: Like Love Blossoms, using the metallic pink for base and black on needle for vein design
(Back to Image)

My Heart All Cut Up - Bright red for base, then using white you paint the top of a heart at the tips and the pointed shape of the heart on top of the nail. The inverted colors make it feel like the heart (in white) is cut out
(Back to Image)

Swirling Love -  A little more complicated, but start first with a dark purple base. I basically laid out all colors on paper (like the first image set with all the colors) and with a brush I just mix different colors to add swirls. Sometimes I mix #03 and #05, sometimes #02 & #06. At the end of it, you have multi layers of different color.
(Back to Image)

Young Little Love - Start with a metallic pink base, then add the french twist of bright red, with three pink dots for an over-the-top cuteness. Just like all young, puppy love. Sweetened and too cute
(Back to Image)

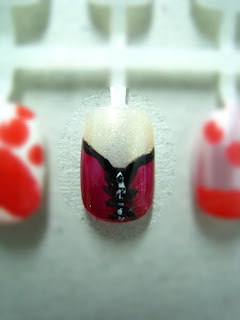
Seduction - Gold base, with bloody red forming a v shape at the mid-section of the nails. Paint the bottom of the V-shape bloody red and then add in the black outlines. A little white to the black laces will make it look more defined
(Back to Image)

Love is a disease - White base, with bright red inverted heart near the tip. Add in dots and you'd have the design look like the above pattern
(Back to Image)

True Bloody Love - Inspired by the vampire love stories. Using white as base, and bloody red for the blood trickle design. Mix bloody red with a pinch of black and make the gradient paint upwards from the tip of the nails
(Back to Image)

Love like a Lifeline - Simple bloody red base and a white on needle nailart
(Back to Image)

Love Prints - Bright red base with a white strip down the nail. Add little hearts to the white, first make two dots like Mickey Mouse ears and then using a brush, paint the rest of the heart shape
(Back to Image)

Love is golden - Two coats of bloody red and start brushing gold paint from the tip of the nails. Have in intensely concentrated at the tip and slowly fade it upwards. Like a gradient
(Back to Image)

Hope you like this experiment brought to you by Nailify.
Next week - Green Eyed Monster and Its Jealousy

Thursday, 19 May 2011

A little white flower saves the day

I got inspired by the works of cutepolish and decided to do something related to a white flower.

What you would need:
- Yellow, Green and white nail polish (see image 6)
- A dotter (I used a pen, see image 2)
- Cotton Sticks (see image 3)
- Paper
- Nail Polish Remover
- Base and top coat of your choice

Beauty Regime:
1. Prep your nails by cleaning the hands followed by a layer of base coat
2. Put some green nail polish on the paper
3. Using a pen or a dotter of your choice, create "cloud shapes" at the tip of the nails
4. Put some yellow on paper. Add a dot of yellow on each nail (see image 1)
5. Put some white on paper. Using the cotton sticks (as I need smaller, leaner petals) draw out the shape of petals. Cover some of the yellow to make the yellow dot look smaller (see image 3)
6. Add on a small dot of yellow to re-define the flower's pollen by angling the pen so you get a smaller dot
7. Add two layers of top coat when the paint has more or less dried up (see image 4, 5)

And you're done! P.s. I'm gonna start a new project, watch this space! :)

Saturday, 14 May 2011

Summer Edge

It's insanely hot these days. Sometimes as I head back for the office post-lunch, I can literally feel my eyeballs boiling inside-out.

So I made some new nails! A close friend asked me how I managed to keep changing the nails. The answer is Youtube, filled with cute videos to inspire you. I'm not exactly showing you girls a good tutorial here, but most importantly if I can paint these nails so can you! It's not difficult, and practice is the key. And I will keep on adding to the palette for you to get inspired.

Summer nails for the summer days. Colorful, simple and sweet.

IMG_7881

Initially I wanted to do a simple gloss French Tip. But, it was really boring, with the shimmery nude base and white tip. So I colored it, and unable to single out one color, I took on four shades.

Things you need:
- Deep blue, Sunny Yellow, Orangey from FaceShop
- Jade Green from Etude House
- Shimmery nude from FaceShop
- Base and Top Coat of your choice
- White from Chatmignon

Beauty Regime:
1. As always, prep nails with a good base coat
2. Fill in the nails with shimmery nude
3. Using white, sketch out a rough line on your nails of where the stripes begin
4. Mentally divide each nail into four lanes
5. Take one of the colors, and fill in the stripes at random lanes on every nail
6. Do the same for the other colors for all nails
7. When it has dried, finish it with a good top coat

IMG_7882

And you're done!

For people with shorter nails - you can do it too!
I swim twice every week and I soon realize that the chlorine damages my nails extensively. Imagine if I didn't have the polish on, my nails will be inevitably brittle. It started eating into the edge:

IMG_7891IMG_7895

I trimmed them all! It still looked great, so short nails can use this look too! :) For swimmers, always always have your top coat refreshed every few days!

Summer Toenails in 5 minutes

IMG_7899

IMG_7901

Wednesday, 11 May 2011

Nails of Nature

After staring at work panels constantly pinning the colors of blue, pink, yellow and green on my screen and into my brain, I became hopeless infected. The brain starts to tick that way, and the colors take over every shred of common sense left until nothing remains.

So I decided to give myself a treat during the weekends and wanted to paint the town, I mean the nails red. Or the colors picked out below -

IMG_7818


That's right! Those colors are haunting me! But I only realized it after finishing a 40 minutes nail-painting session.

IMG_7820What you need-
- Deep blue, Hot Pink and Sunny Yellow (all from FaceShop)
- Jade Green from Etude House
- Base Coat and Top Coat of your choice
- Cotton Sticks (ear-cleaning types)
- Nail polish Remover
- A4 Scrape Paper (except newspaper)


Beauty Regime:
1. Coat nail with 2 layers of Base Coat
2. Color the nails green, evenly
3. Add a French Twist of blue at the edge of the nails
4. Dab a swash of yellow on the paper and pick up some with the cotton stick
5. Dot the nails, at random positions for each nail to point where you would paint flowers
6. Dab another swash of pink and pick up some with the cotton stick
7. Using it like a brush, dab pink onto the nails to create the design of a flower
8. Don't wait too long before the green dries properly, or step 5-7 would prove to be difficult
9. Finish with 2 layers of Top Coat for each nail
10. You can refresh with another Top Coat after every three days if you wish to keep these nails for a longer period of time

IMG_7828IMG_7819

And you're done! More photos here