Wednesday 13 March 2013

Back! With some watercolor nails!

Here's a new post after some time - tried out something new and thought I'd share it!
By the way I'm also on Pinterest if you'd like to follow me there :)

The watercolor nails series!
So I did a share of the image on instagram and someone said it looked like paddle pop and I thought it looked the brand desigual's color. All in all, it uses some very striking color. And the reason why I choose this design was because people kept giving me nail polish and I hadn't had time to try them all! Might as well do that all in one go, ha!


Presenting to you the colors used! All the OPI ones are given
by my beloved girl friends, thank you for the love ♥
Very important items - the basic coat and top coat!

All you need to do is to get a facial sponge (no need for super
smooth types, the kind you use for foundation)
Initially I thought I might have used too
many colors but it blended yummily
As usual, a shot with the keyboard. Colors look remarkably striking!
All in all I'm happy with the results, and you can learn more about
making water color effects on youtube if you're new to the idea.
It's fairly simple!


Monday 10 September 2012

Tutorial: How to dot the nails

One of the easiest to create nail design is a polka dot nail - so how can we create it, hassle free?

Well, while I cannot gurantee that this is a sure-fire method that doesn't create even a little bit of mess it is one of the more reliable methods that other nail artists are also using

First, obtain a set of nail dotting tools. Instead of buying, I looked around the house to round up some items that I find helpful.

Just some examples of what I use, they all have different
dot circumference.
 

Next is to lay out your colors on a paper (that can hold the nail paint and won't seep it onto the surface area behind the paper.

Using these, you...

..dab onto these colors and then transfer them to nails
Have a really cute cat to calm your nerves!


You can create all sorts of designs with the dotting method: flowers, clouds - anything round!
Now, go have some fun!

Sunday 9 September 2012

Lady Buggies

So for some reason, I'm in love witht he lady bug prints. So I made them into nails :3

It's actually very simple and there are two ways to doing the lady bug nails: one is to pain the nails black but leave the bottom part for the red, then fill in the connecting portion with black nail art pen so that the line is nicely defined.

Another way is to pain the entire nail red, and cover the top with black and then filling up any crooked lines with a nail art pen.

Will be doing a post to talk about dotting your nails, but it's really fairly simple once you know about it! Have fun lady buggies!

Lady bug nails for the thumb and ring finger :)

Remember to add a line in the middle to
create a realistic body for your buggy!

Love the colors, really brightens the dull
rainy season!
      

Friday 3 August 2012

More bridal nail sets!

Finally, all dust has settled and I can now post photos!

The first three - (i) Laced (ii) Royal Princess (i) Crowned Queen

Next three - (i) Floral Punk (ii) Quirks and Dots (iii) Jewelled

And the last three - (i) Lace and ties (ii) Star! (iii) Aqua Mermaid

Originally, I wanted all nals to be this!

And the ring finger to feature this!
But alas, I did not manage to find time for all that, and because I went over to Hong Kong to get married, I was lacking a full equipment for the works!

Tuesday 19 June 2012

Da-da-da-duuuuum!

So, allow me to start off with a sincere apology! My recent absence needs a little explaining and I shall do that here and now, with some photos!

The thing is *fidget*I-got-married*fidget*
And during the past three months or so has been packed with planning, shopping and events leading up to the small but eventful affair! Let me share some photos, especially my wedding nails :)

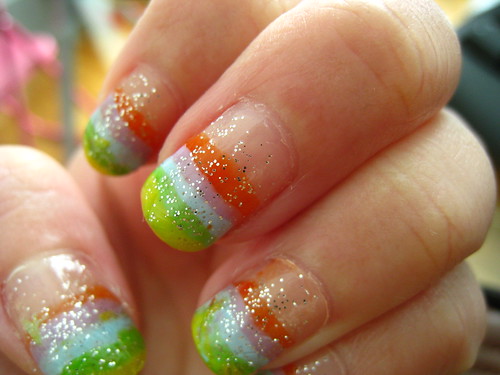
Here are the nails, and the rings :)
Getting an inspiration from elsewher, I've decided to  paint the
ring finger in a different color, so hubby knows where the ring should go!
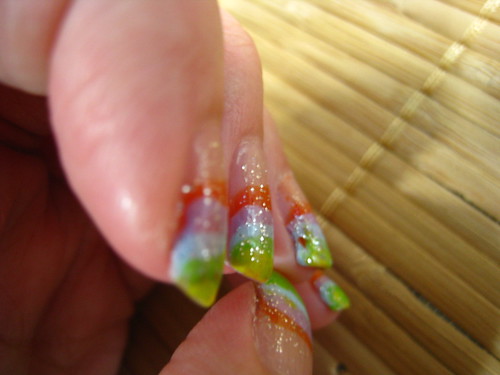
A close-up: Using nude base and the pearl-translucent pink polish as a finishing coat.
A bit of white floral embellishment using the white nail art pen, topped with glitter french.
A little chip off the thumb finger when I was preparing the flowers.
Thanks to the help of my beloved friend, an aspiring make-up artist, I've gotten some very pretty hand-made accessories to go with the get up!

Lace earrings
Flower bouquet arranged by hubby,
hand wrapped by friend
Lace themed head dress
A closer look at the head-dress
Head dress, well, on the head of course
I love how everything (including our guest card) was hand-made :) It felt like a really eventful affair because of these details! Thank you everyone who helped make it happen (if you happen to read this) and to all my readers, next up are some experiments on bridal nail art. Stay tuned :)

Monday 28 May 2012

Add a ribbon!


Sorry that I've been out of action for awhile! Getting married soon and the preparation is just keeping me on the toes, busy busy busy bee! Here's a design I tried out while thinking of how to work the nails!

Next up! Gonna upload some bridal nail ideas :)

Sunday 18 March 2012

Rainbow french for short nails!


It doesn't matter if you have short nails, you can still have pretty, elongated nails by using this rainbow french design!

Rainbow French w Glitters!
A little different from our previous cloud and rainbow design, this uses 5 colors and your natural nail color to achieve the final design. Following are tips and steps for you to follow!

  • Choose colors, go for pastel and striking colors
  • Paint sequence from color on top (orange in this case)
  • After every color, clean off the bottom half of it leaving only a strip of the color
  • This allows the paint to dry more evenly and faster
  • Follow up with the other colors, go for horizontal strokes or use a flat-tip brush
  • Once done, seal with glitters and nail top coat
  • Give it at least 15 minutes to dry, due to the multi-color coats
  • Run it under cold water to seal everything in :)
IMG_9491
Glitters make the design more funky and 3D!
IMG_9500
I love how it has a curve like the rainbow when you look at it from sides

    And my favorite all-time shot: with the keyboard!